
3D Print Files for CTH Motor Mounts
______________________________________________________________________________________________________
______________________________________________________________________________________________________
Kevin's 3D printed motor mount and Spektrum Remote ID case designs for CTH planes.
The original lightweight 16mm mount shown below was designed to make it possible to use Quadcopter motors on our flying wings. The larger version is an 125% printing of the same file which will work with our 2812 and 3530 motors. If the screw holes are not exactly where you need them, use a hot soldering iron to make adjustments. Hot glue makes a permanent glue bond. We suggest you use washers to keep the bolts from pulling though the mount. You can use a sharp tip soldering iron to customize holes for your specific motor. These mounts are printed 60% to 85% fill.
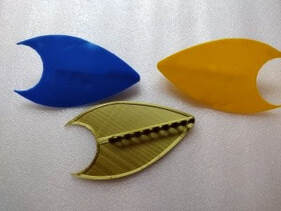
The "Wide" versions (printed in red) have a plate that replaces the Formica plate we have been using. The "Strong" versions (printed in yellow) are beefed up "Wide" versions that extend past the motor plate and have a wedge to reinforce the angle to make them even stronger. We recommend the Strong Version for most applications.
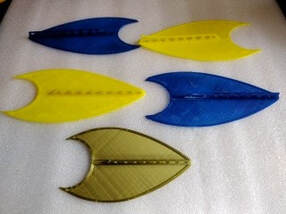
The fins (winglet file) are designed to be glued into a slit in the wingtip. You can enlarge or shrink them to fit your application.
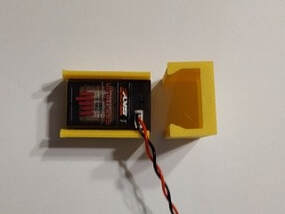
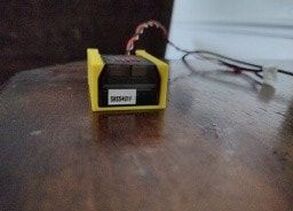
To meet the remote ID requirement we have purchased the Spektrum Remote ID modules. We wanted to be able to changed them plane to plane quickly and to secure them in the plane without a lot of hassle so we have designed some quick mounts that fit this module. Module #1 is inserted from the end and module #2 can be inserted from the top. We do recommend you put a clear piece of tape over the module to prevent loss or movement of the module. The Spektrum Remote ID can get power from your receiver so we suggest you put a servo extension in one of the unused plugs on the receiver and leave it hanging out for easy access for power to the Remote ID module.
Here is a comparison of types of 3D printing filaments. We have heard of some motors running so hot they have melted some of the 3D printed motor mounts. So far we haven't had any trouble but it is winter here and our motors don't run that hot anyway. All of the mounts you see below are printed with PLA or PETG filaments.
https://www.xometry.com/resources/3d-printing/types-of-3d-printer-filaments/
.
The original lightweight 16mm mount shown below was designed to make it possible to use Quadcopter motors on our flying wings. The larger version is an 125% printing of the same file which will work with our 2812 and 3530 motors. If the screw holes are not exactly where you need them, use a hot soldering iron to make adjustments. Hot glue makes a permanent glue bond. We suggest you use washers to keep the bolts from pulling though the mount. You can use a sharp tip soldering iron to customize holes for your specific motor. These mounts are printed 60% to 85% fill.
The "Wide" versions (printed in red) have a plate that replaces the Formica plate we have been using. The "Strong" versions (printed in yellow) are beefed up "Wide" versions that extend past the motor plate and have a wedge to reinforce the angle to make them even stronger. We recommend the Strong Version for most applications.
The fins (winglet file) are designed to be glued into a slit in the wingtip. You can enlarge or shrink them to fit your application.
To meet the remote ID requirement we have purchased the Spektrum Remote ID modules. We wanted to be able to changed them plane to plane quickly and to secure them in the plane without a lot of hassle so we have designed some quick mounts that fit this module. Module #1 is inserted from the end and module #2 can be inserted from the top. We do recommend you put a clear piece of tape over the module to prevent loss or movement of the module. The Spektrum Remote ID can get power from your receiver so we suggest you put a servo extension in one of the unused plugs on the receiver and leave it hanging out for easy access for power to the Remote ID module.
Here is a comparison of types of 3D printing filaments. We have heard of some motors running so hot they have melted some of the 3D printed motor mounts. So far we haven't had any trouble but it is winter here and our motors don't run that hot anyway. All of the mounts you see below are printed with PLA or PETG filaments.
https://www.xometry.com/resources/3d-printing/types-of-3d-printer-filaments/
.
| 16mm_motor_mount.stl |
| wide_16mm_motor_mount.stl |
| wide_23mm_motor_mount.stl |
| lt_winglet_100mm.stl |
| strong_16mm_motor_mount.stl |
| strong_25mm_motor_mount.stl |
| remote_id_mount.stl |
| remote_id_mount_2.stl |
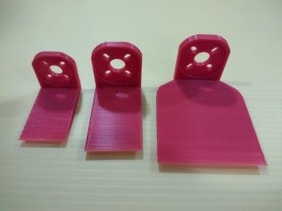
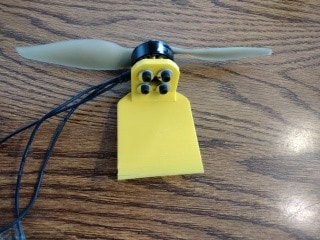
This is the original small and lightweight mount designed to put quad motors on our flying wings.
|
|
|
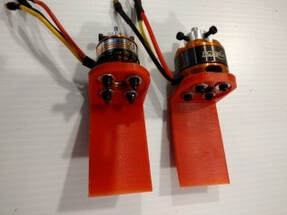
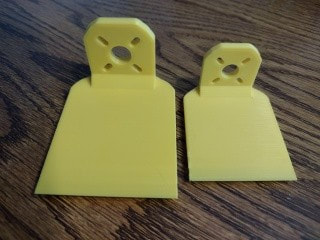
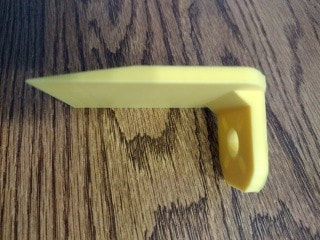
These are the strong motor mount designs with a thicker motor plate and a wedge at the angle to increase strength.
|
|
|
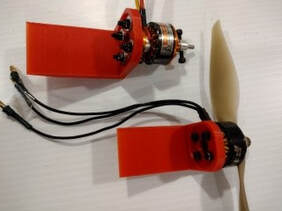
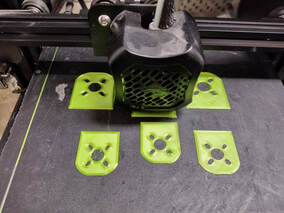
You can print multiple mounts at the same time. The fins are designed to be glued into a slot in the end of the wing.
|
|
|
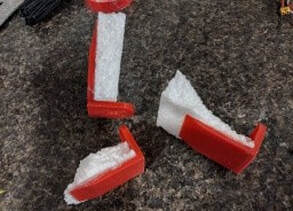
Hot glue works great with the 3D printed mounts. I can't peel the EPP foam off when glued with hot glue.
The Spektrum Remote ID mount files. Version #2 snaps in from the top and version #1 slides in from the end.
The Spektrum Remote ID mount files. Version #2 snaps in from the top and version #1 slides in from the end.
|
|
|
Designs by our customers:
Grim Reaper motor mount design by Jeff
https://www.rcgroups.com/forums/showpost.php?p=51657021&postcount=12357
Assassin and Rebel
https://www.rcgroups.com/forums/showpost.php?p=51651861&postcount=2182
Vertigo
https://www.rcgroups.com/forums/showpost.php?p=51660429&postcount=2190
Thingiverse RC motor mounts
https://www.thingiverse.com/thing:2626657 - Designed for the CTH Assassin
https://www.thingiverse.com/thing:2428204 - Another CTH Assassin design
https://www.thingiverse.com/thing:1310526
https://www.thingiverse.com/thing:3705055
__________________________________________________________________________________________________
Print your own ready-made decals
The following files have been done by Les who has made them so you can re-size and modify them to your needs with a Word document.
Here are his instructions:
1. Click on a Word file below and it will download to your PC, either save the file or select an image, copy and save.
2. Click on the image so that the dotted border can be seen. Re-size as needed and then print. Note that clicking/hold on the green dot will allow the image to be rotated into landscape format. If you want to modify the image, 'Picture Tools' will appear in the toolbar at the top, use the tools to make any changes and to alter the color.
3. Select a picture frame if wanted
4. Use Corrections, Colour, Artistic Effects and the other buttons to change the image to suit.
5. Expand or contract image - all elements are grouped and will re-scale equally. If the image is stretched too much it may disappear from the page, ‘Undo’ will bring it back.
6. Print onto paper in draft mode and place over the model to check the fit, re-size as appropriate.
7. To save photo paper, try and squeeze in a number of images on one A4 page, smaller ones look good on the fins.
Design them yourself
Begin by searching the web for clipart, Bing Image Feed is very good. You can also go to Google and search for "images" such as "Albatross cartoon images". If you search for just "Albatross" you will get pictures of birds.. If you search for "Grim Reaper cartoon images" you will get more simple children's type images and if you search for "Grim Reaper" it will be more intense art images. You can also do searches on Pinterest for some great ideas.
If using Bing, type in your search theme, click on ‘Filters’ at the right side of the screen, then move to ‘Images’ and choose Clipart. If for personal use, licence rights won’t apply, but there are options to select clipart available for commercial use and that’s the filter used to find the elements in the Word files below. Having found an image, click to open, then hit copy, and paste into an MS Word page. Now the editing starts.
Click on the image and ‘Picture Tools’ appears at the top, click on it and the tools palette appears. Firstly, click ‘Position’ to unlock the image so it can be moved around the page and then experiment to see what’s possible. If the image is stretched too much it may disappear from the page, ‘Undo’ will bring it back. Text can be added – click on ‘Insert’ and then on ‘WordArt’., type the text and select the font, colour and size. Picture Tools is a pretty basic graphics package, but is easier to use than vector based software, but it’s not always easy to move text around, so practice is necessary to achieve the right effect. The ‘Send Forward and Backward’ commands allow multiple images to be built up for effect.
One command that is important is to be able to set transparent colour – this renders the selected background transparent, allowing multiple images to be built up and still be seen.
Once you have built up a number of elements, they will have to be grouped so that the image can be stretched or contracted to suit its final location, and have each element move in unison. To do this on a Windows 10 PC, make sure the image is large and is in the centre of the screen, hit the Windows key and prtsc key at the same time – this saves the image in .png format in the ‘Screenshot’ folder on the PC. Open this folder, click to highlight, right click the mouse and Open With Paint (the Paint app should be already loaded in the apps file). Select ‘Crop’, crop the image and save again as a .png picture in a folder you have selected. Finally, go to that folder, click on the file image without opening the file and hit copy, then paste back into a Word file, click ‘Position’ again and you are done, you have an image that is a collection of elements that can be stretched to A4/A3 size without losing resolution.
Printing the Image
The graphic can be printed on a home inkjet printer using A4 Matt/satin or gloss Vinyl Self Adhesive Sticker Paper, easily bought on Amazon or from a company such as PhotoPaperDirect. As the ink is water based, it has to be set with a fixative which is sprayed on. If you have access to a colour laser printer, no fixative would be needed. Alternatively, apply a layer of CTH laminate over the vinyl, making sure there is an overlap to hold it down.
Test print on draft mode, and once happy, print on the vinyl at ‘best quality’ setting, as you would for a photograph. Let the ink dry. Cut around the image to size, remove the backing and it’s ready to enhance that wing.
We like to print the decals and art work on photo paper to get the brightest colors possible then cut them out and either put the decals directly on the foam under the laminate or put them on top of the laminate and use clear tape or laminate to and seal the edges. When attached with 2" wide clear packing tape on top of the laminate they can easily be removed or changed later. Be careful not to add too much weight behind the CG. A dusting of a spray adhesive on the back of the decal helps to hold it in place while you laminate over the top but isn't needed if you are careful when you are laminating or taping.
| crashtest_hobby_logo_options-3.docx |
| dragons_wings_and_flames.docx |
| assassin_decals_final_2.docx |
| bullseye_decals_black.docx |
| bullseye_decals_ready.docx |
| grim_reaper_options_ready_2.docx |
| pelican_albatross_logos.docx |
| pelican_logos.docx |
| pinata_logos.docx |
| rebel_logos.docx |
| scythe_and_cth_logos.docx |
| scythe_logo_edited_and_locked.docx |
| vertigo_logo.docx |
| 16mm_motor_mount.stl |